Two new homeowners share their rental suite renovation...and the numbers behind it
What does it cost to put a rental suite in your house? What should you consider when designing a rental suite? My clients and new Squamish homeowners, Corey & Lauren, answer these questions and give us a tour of their new space.By: Corey Hill & Lauren Meeker
Look, it’s no secret that it is a challenging time to be a first-time home buyer in British Columbia, particularly in the Sea to Sky region. While that might be the understatement of the year, the good news is that there are creative ways to bring down the effective costs of home ownership. One of the most common ways is to build a rental suite in your new home.
For those who are unfamiliar, a rental suite - also known as an “additional dwelling unit (ADU)” or “mother-in-law suite” - is simply a separate living space that you rent out to someone else, typically on a monthly basis. It has a separate entrance, kitchen, bathroom(s), and bedroom(s). Most often they are built in the basement of a home or externally as part of a carriage house.
Why Build a Rental Suite in Your Home?
Quite simply, having a rental suite as part of your home makes homeownership more affordable. The monthly revenue you generate from this part of your home allows you to offset some of the monthly carrying costs of your new home. This includes the mortgage, property taxes, insurance, utilities, electricity, and maintenance.
When looking at buying a home, the prospect of adding a suite can significantly increase your buying power. For example, let’s assume you are comfortable with monthly carrying costs of $4,000. Say this allows you to comfortably afford a $1,000,000 house. However, if you have a 1-2 bedroom rental suite that you rent out for $1,500-2,500 per month, the carrying costs you are comfortable with now goes up to $5,500-6,500. Being able to manage these higher costs on a monthly basis, your buying power has now increased to a $1,250,000-1,500,000 house.
Now that you have a solid understanding of what a rental suite is and how it impacts your buying decisions, let’s take a look at our own real life case study.
Case Study: From Homebuyers to Renovators to Landlords
Hi! We are Corey & Lauren, a couple of first-time homebuyers who moved into our new Squamish home in Spring 2021. From the beginning of our house hunt, our goal was always to find a home that either (a) Had a rental suite already built, or (b) Had the potential to build out a rental suite ourselves. We knew that this would be key for us to both reduce the carrying costs of the home and allow us to build equity in our new home faster.
With the help of Victor’s realtor savvy and builder prowess, we were able to land in a wonderful new home with great suite potential. After moving in at the beginning of June 2021, we started on the construction of our basement rental suite. Let’s take a look at what the project entailed!
Scope of the Project
The home we purchased had a fairly sizable basement, offering plenty of room for putting in a suite while also keeping some of the space for ourselves. Victor helped us brainstorm multiple suite layouts and orientations and evaluate them based on things like complexity of renovation, liveability, and efficient usage of space. When looking through the different options, he encouraged us to “lean into” what the existing build was offering, and not try to force the exact layout we wanted. Ultimately we decided on the layout below.BASEMENT SUITE RENOVATION
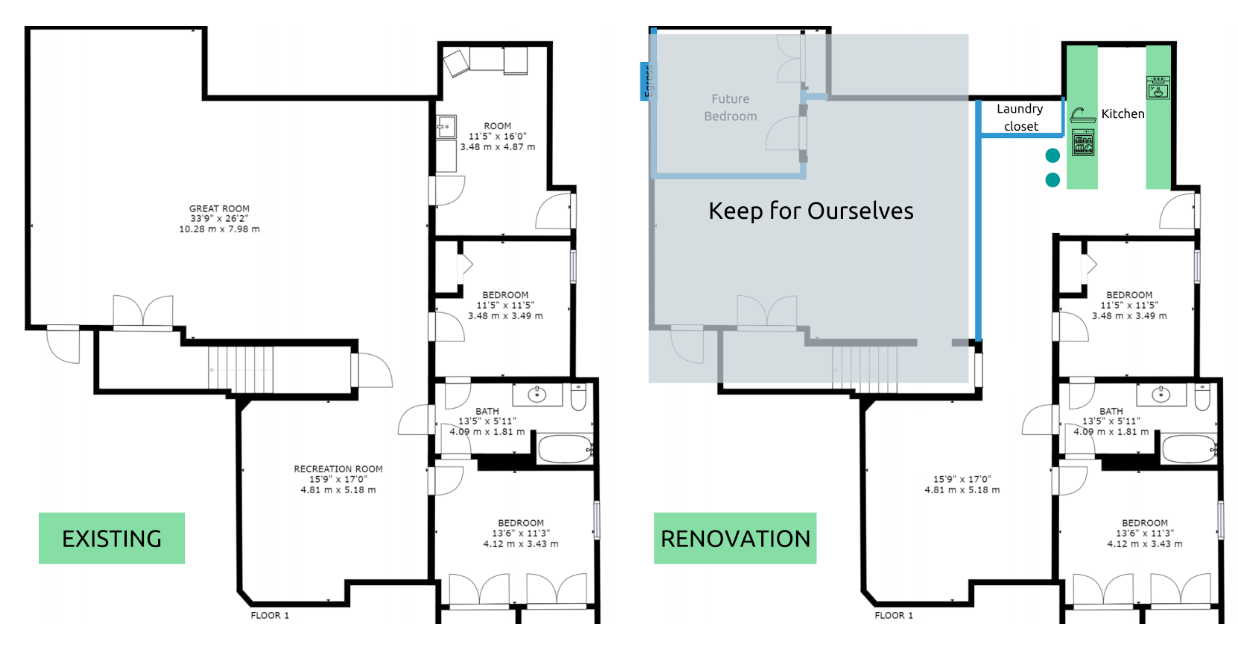
The key advantage of this layout was that it allowed us to use the existing bathroom, two bedrooms, side entrance, and plumbing access. By leaning into what the existing build was offering us we were able to minimize the complexity, time, and cost requirements of the renovation.
That said, there was still a lot of work to be done. Here is a high-level summary of the scope of the renovation:
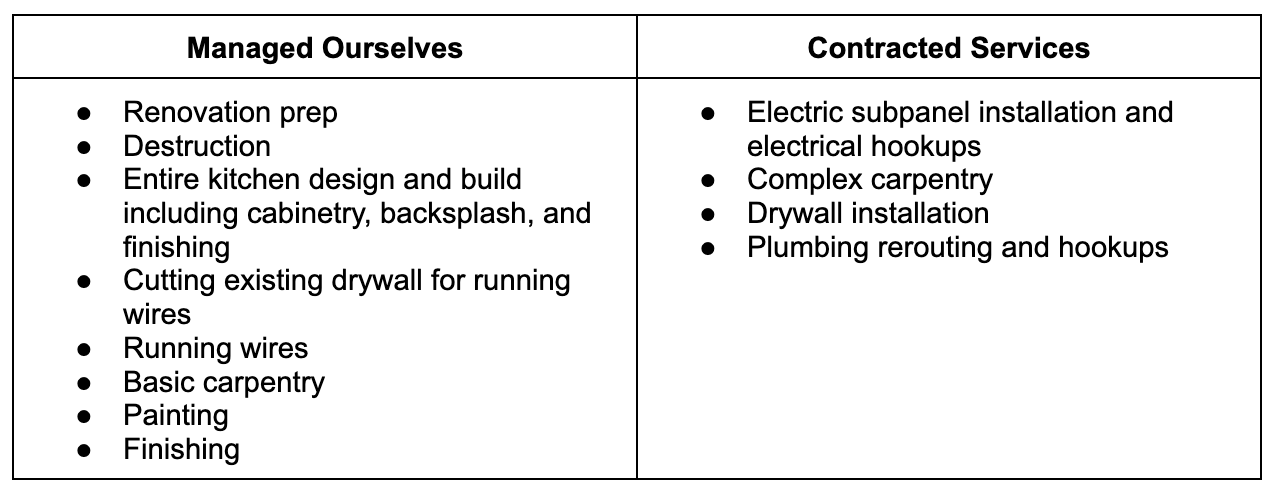
- Removal of a load-bearing wall to make space for an open-concept kitchen, plus the subsequent installation of a beam to replace the wall.
- New construction of an entire galley-style kitchen. We chose the kitchen layout based on the existing plumbing location. Again, leaning into what the existing build offered.
- New installation of an electrical subpanel in order to run all the new kitchen and laundry appliances.
- New construction of a laundry closet. The location was chosen again so that we could tie into the existing plumbing.
- New construction of a sound-proof divider wall (shown in blue) to separate the suite from the basement area that we wanted to keep.
- Opening of a load-bearing wall and installation of a new access door for the basement area that we wanted to keep.
- Installation of ⅝ths drywall and Green Glue on top of the existing suite ceiling for sound and fire-proofing. This was also added to the divider wall.
The Cost of Adding a Rental Suite
Given that we had just “emptied the war chest” in order to buy our new home, keeping the renovation budget in check was necessary. For this reason, we wanted to do as much of the work ourselves as possible, without compromising the quality or safety of the build, obviously.
We had little to know renovation or construction experience coming into this project, but we were keen to learn! Invaluably, Victor coached us through all the things that we could do by ourselves, giving us advice and tricks of the trade along the way. Not your average realtor!
See below for the responsibilities and tasks that we did ourselves vs bringing in the pros.
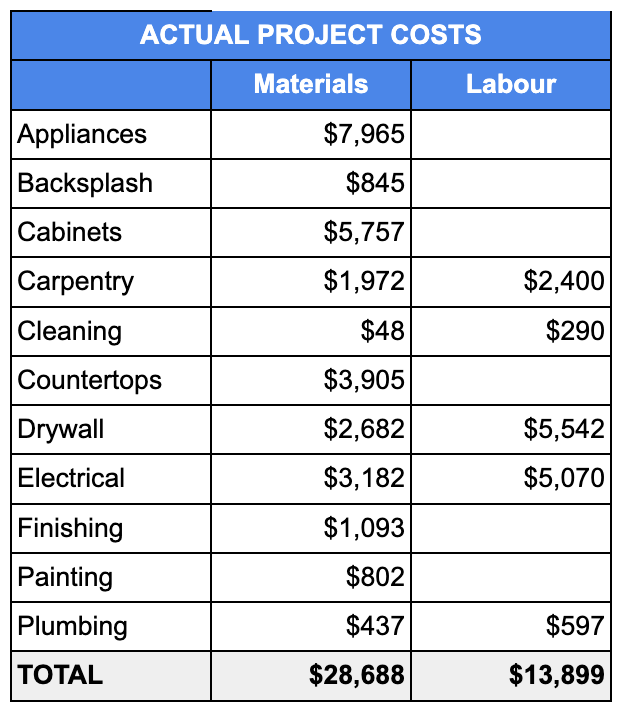
In total, the renovation cost about $42,587, 2/3rds of which went to Materials and 1/3rd of which went to Labour. It’s worth noting that by doing most of the work ourselves under Victor’s guidance, we probably saved an additional $12,000-15,000 in Labour costs.
Could we have done this cheaper? Probably. While we didn’t choose the highest-end options, we did opt for slightly more expensive appliances, countertops, and backsplash than we probably needed to. But we knew that the new kitchen was going to be what sold the place to potential tenants, so we wanted to do it right, and do it once.
In addition, we renovated during a Covid-driven material shortage so the cost of lumber, wire, and drywall was anywhere from 20-100% more expensive than normal. By choosing less expensive finishes and without the inflated costs of materials, it would’ve been possible to save an extra ~$5,000 on Materials.
Finished Reno: Our Brand New Rental Suite
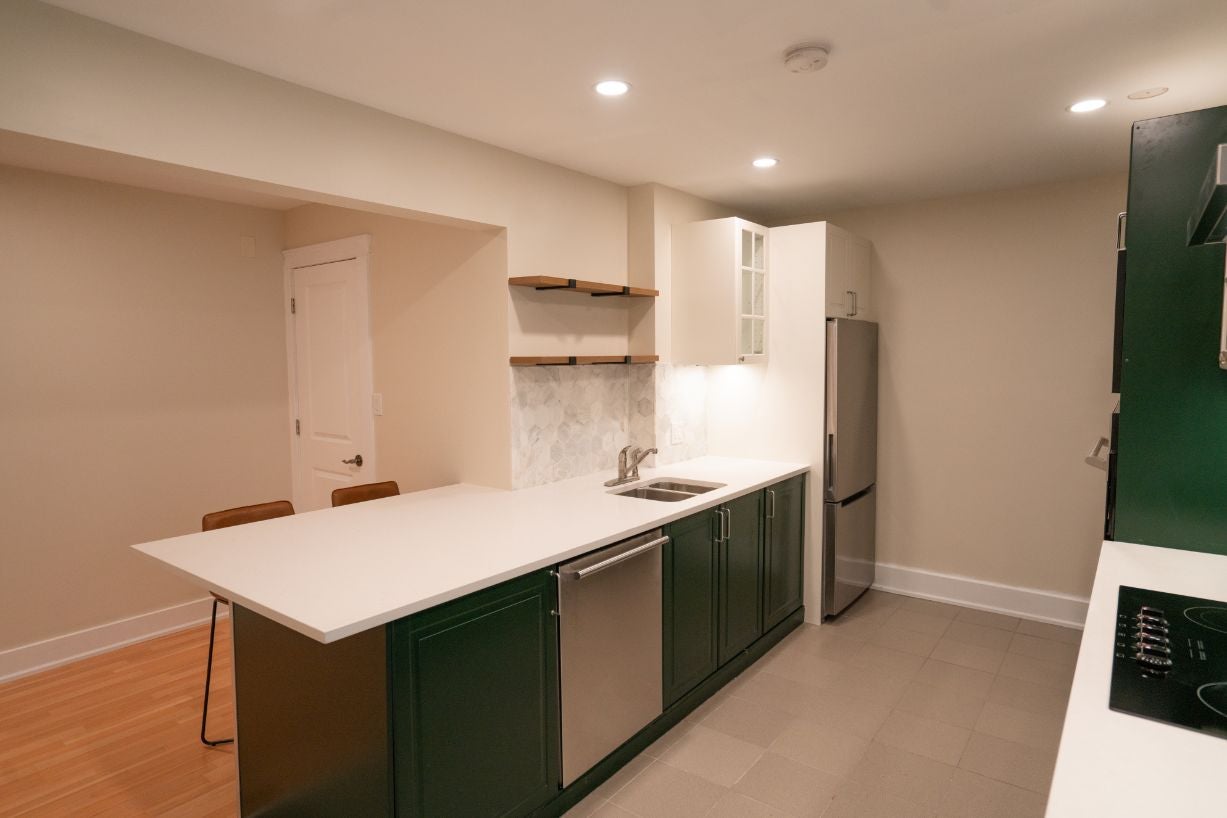
All in all, this project took us about 3 months to complete. No doubt it took a bit longer because we were handling so much of the work ourselves while still having day jobs to tend to. But we are THRILLED with the result. Take a look for yourself!
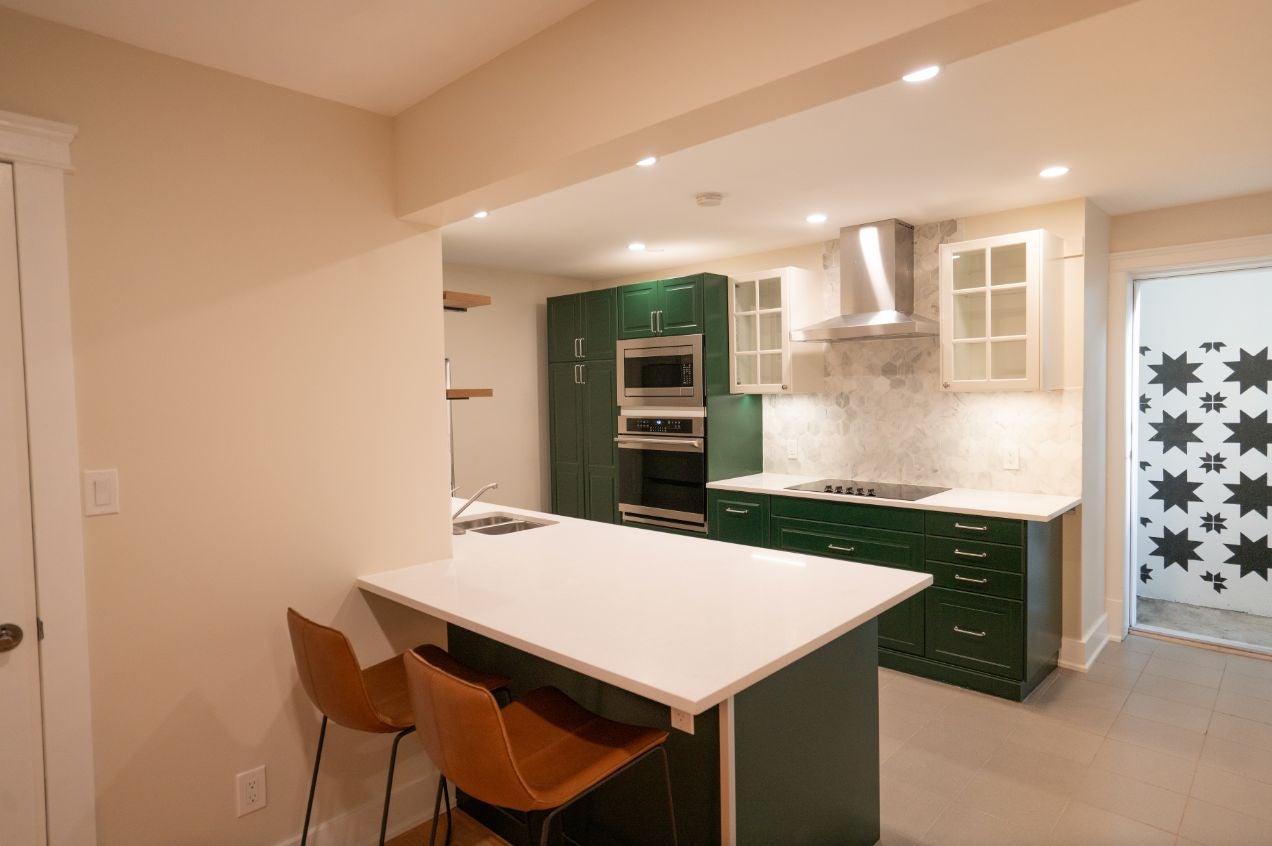
As mentioned, we knew that the kitchen was going to be the biggest selling point for our suite and allow us to attract a great tenant at the price we wanted. So we definitely went a bit over budget there, but we couldn’t be happier with how it turned out.
Based on other rental suites in Squamish, we determined that $2,400 was a fair monthly rent for our higher-end 2-bedroom, 1-bathroom unit. The market agreed. Within 24 hours after posting on Facebook Marketplace, we had over 60 messages about the unit and 9 viewings booked. We had a lease signed with a great tenant within 48 hours of listing.
Based on other rental suites in Squamish, we determined that $2,400 was a fair monthly rent for our higher-end 2-bedroom, 1-bathroom unit. The market agreed. Within 24 hours after posting on Facebook Marketplace, we had over 60 messages about the unit and 9 viewings booked. We had a lease signed with a great tenant within 48 hours of listing.
Financial Implications
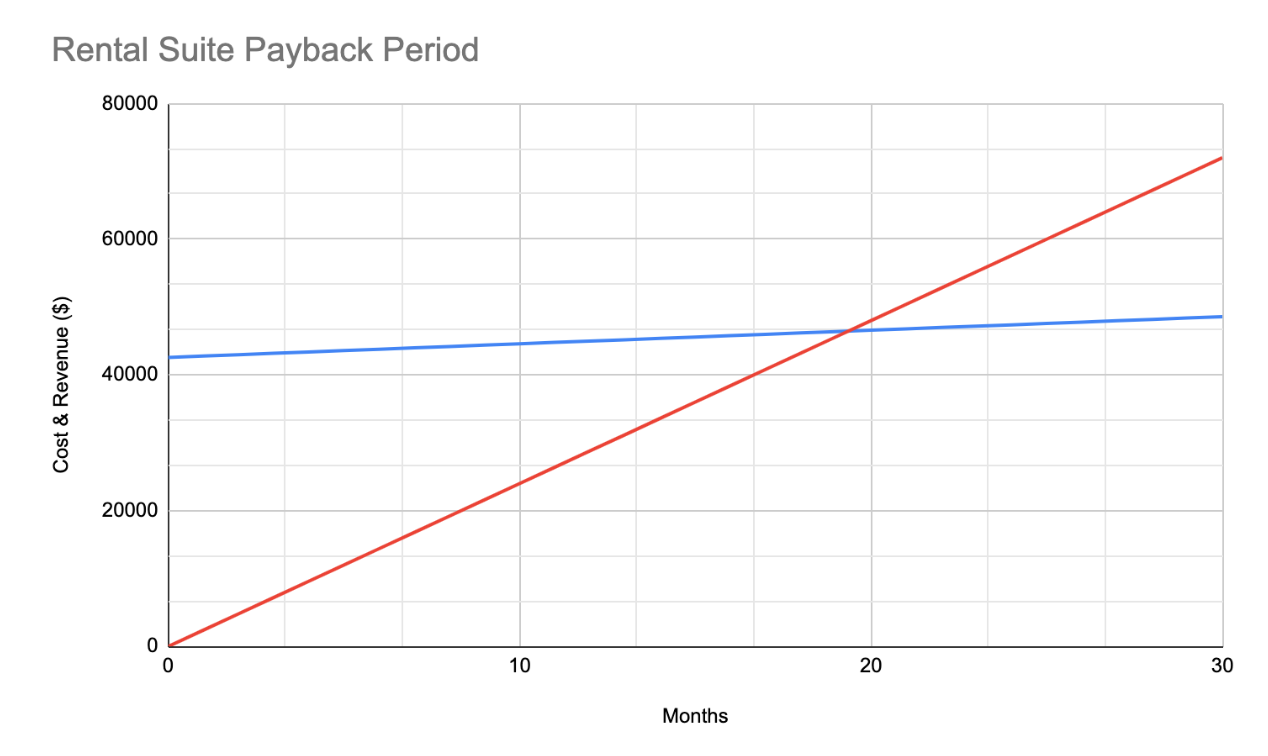
Now that we’ve looked at the scope of the project and the overall budget, let’s get into the numbers. As mentioned, the total renovation cost was $42,587 and we signed a lease with a tenant for $2,400 per month.
Increasing our Buying Power and Decreasing Financial Stress
Having the rental suite is a game-changer for us in terms of “how much house” we can afford. In total, the monthly carrying cost of our home, including mortgage, insurance, hydro, property taxes, and utilities, is around $6,200. On our own, this would definitely be stressful for us. However, with the rental suite our effective carrying cost is $3,800 per month - nearly 39% lower!
This reduced carrying cost allowed us to purchase a more expensive home than we could otherwise afford on our own. It makes our monthly budgeting much more manageable and allows us to build equity in our home faster.
This reduced carrying cost allowed us to purchase a more expensive home than we could otherwise afford on our own. It makes our monthly budgeting much more manageable and allows us to build equity in our home faster.
Payback Period
Increasing Our Home Value
Beyond the cash flow benefits of the rental suite, adding a rental suite also increases the value of a home. After all, you’re adding a revenue-generating space!While it varies a fair bit, as a rough estimate you can assume that a rental suite increases the value of your home by roughly 10X the annual net revenue it generates. So roughly $150k for a 1-bedroom suite or $250k for a 2-bedroom suite. This is great for future resale value or borrowing against your home.
Although it was a ton of work, constructing our rental suite was a hugely rewarding project. Beyond the explained financial benefits, doing most of the work ourselves gave us a strong sense of ownership.
